Sunday, August 23, 2026

How I Built a Local PDF PII Redaction Tool Before Uploading Documents to AI

I wanted to use AI to analyze a sensitive PDF, but I did not want to upload the original document with personal information intact. The document was also large, around 60 pages, with names, identifiers, contact details, and other PII repeated many times. Manually finding and redacting every occurrence would have been tedious and easy to get wrong.

My requirements were:

  • Run completely locally on Windows.

  • Open and process a large PDF, around 60 pages.

  • Automatically detect likely PII across the document.

  • Find repeated names, emails, phone numbers, dates, IDs, and similar fields.

  • Let me review the detections before applying them.

  • Keep useful analytical fields such as age, premium, cash value, surrender value, MEC information, loan provisions, and policy values.

  • Export a sanitized PDF that I could then upload to ChatGPT, Claude, Gemini, or another AI tool.

The goal was:

Original PDF -> Local PII Detection -> Review -> Redact -> Sanitized PDF -> AI

Finding the Right Tool

I looked at OpenRedact, PDF24, PDFgear, PDF-XChange, and a few other options.

Most traditional PDF tools work well when you already know exactly what needs to be removed. My requirement was slightly different: I wanted the software to help identify what might be PII first.

I eventually found:

PII GUI

https://github.com/sophia486/pii-gui

It is an open-source desktop application built with Tauri, React/TypeScript, Rust, and ONNX-based local detection.

Why I Built It From Source

The downloaded Windows installer triggered Microsoft Defender SmartScreen:

Windows protected your PC
Publisher: Unknown publisher

The executable also had no Digital Signatures tab in Windows Properties.

That does not automatically make an application unsafe, but since I planned to use it for sensitive documents, I decided to build it directly from the GitHub source instead.

Clone the Project in VS Code

I used VS Code because the project uses TypeScript, React, Rust, and Tauri.

Press:

Ctrl + Shift + P

Choose:

Git: Clone

Repository:

https://github.com/sophia486/pii-gui.git

My local folder was:

D:\ch-projects\pii-gui\pii-gui

Install the Required Tools

Check what is already installed:

node --version
pnpm --version
rustc --version
cargo --version

I already had Node.js.

Install pnpm

npm install -g pnpm

Verify:

pnpm --version

Install Rust and Cargo

Install Rust from:

https://rustup.rs/

Then verify:

rustc --version
cargo --version

If VS Code cannot find them:

where.exe rustc
where.exe cargo

Rust normally installs under:

C:\Users\<username>\.cargo\bin

Install Visual Studio C++ Build Tools

Open Visual Studio Installer and install or update:

Build Tools 2022 -> Modify -> Desktop development with C++

Make sure the latest available versions of these are installed:

  • MSVC v143 C++ build tools

  • Windows SDK

  • C++ CMake tools

This became important because ONNX Runtime depends on native C++ libraries.

Install Project Dependencies

Go to the Tauri directory:

cd D:\ch-projects\pii-gui\pii-gui\tauri

Then:

pnpm install

Run the development version:

pnpm tauri dev

Fixing the ONNX Runtime Linker Error

My first build produced a large number of linker errors such as:

LNK2001: unresolved external symbol __std_find_last_of_trivial_pos_1

and:

__std_search_1
__std_remove_2

The problem was not React, Rust, or Tauri code.

The ort-sys dependency was using a statically linked ONNX Runtime built with a newer MSVC C++ Standard Library than my installed Visual Studio 2022 Build Tools 17.10 provided.

The fix was to update the MSVC v143 C++ toolset and Windows SDK using Visual Studio Installer.

Then I cleaned the previous Rust build:

cd D:\ch-projects\pii-gui\pii-gui\tauri\src-tauri
cargo clean
cd ..
pnpm tauri dev

Port 1420 Already in Use

At one point Vite reported:

Port 1420 already in use

Find the process:

netstat -ano | findstr :1420

Then stop it:

taskkill /PID <PID> /F

Run again:

pnpm tauri dev

Opening a PDF

The GUI did not make the PDF-open option obvious.

The shortcut is:

Ctrl + O

That opens the Windows file picker.

You can then select the PDF and load it into PII GUI.

For my use case, this was important because the document was about 60 pages long and contained many repeated PII entries.

Instead of manually working page by page, the workflow became:

60-page PDF -> Detect PII Across Document -> Review Matches -> Apply Redactions -> Export

Reviewing PII

PII GUI can detect categories such as:

PrivatePerson
PrivateEmail
PrivatePhone
PrivateDate
PrivateUrl
Secret
UserId

The key part is that the results can be reviewed before redaction.

That matters because not every detected value should be removed. In an insurance illustration, for example, I may want to preserve:

  • age

  • underwriting class

  • premium

  • face amount

  • cash value

  • surrender value

  • MEC values

  • loan information

  • policy charges

while removing names, addresses, phone numbers, and identifiers.

Build the Windows Installer

After confirming the app worked with:

pnpm tauri dev

I created the release build.

Tauri generated both an NSIS .exe installer and an MSI installer under:

D:\ch-projects\pii-gui\pii-gui\tauri\src-tauri\target\release\bundle

The NSIS installer was under:

...\bundle\nsis

The MSI installer was under:

...\bundle\msi

I verified them using:

Get-ChildItem `
'D:\ch-projects\pii-gui\pii-gui\tauri\src-tauri\target\release\bundle\nsis', `
'D:\ch-projects\pii-gui\pii-gui\tauri\src-tauri\target\release\bundle\msi' |
Select-Object FullName,Length,LastWriteTime

Tauri Signing Warning

The release command returned exit code 1 because updater signing was enabled but:

TAURI_SIGNING_PRIVATE_KEY

was not configured.

The message was:

A public key has been found, but no private key

The important point was that the installers had already been generated successfully. The failure was related to updater signing, not the application build itself.

Install the Locally Built Application

The generated installer was:

D:\ch-projects\pii-gui\pii-gui\tauri\src-tauri\target\release\bundle\nsis\PII GUI_0.1.2_x64-setup.exe

After running it, PII GUI was installed like a normal Windows application and could be launched from the Start menu.

Final Workflow

My everyday process is now:

Launch PII GUI -> Ctrl + O -> Open PDF -> Detect PII -> Review -> Redact -> Export Sanitized PDF -> Upload to AI

For the blog screenshots, I only use pages from the final sanitized PDF. I do not publish the original before-image because it contains real PII.

Bottom Line

The original problem was simple: I had a large, approximately 60-page PDF with many repeated personal-information fields, and I wanted to use AI to analyze it without sending the original PII.

Building PII GUI locally gave me a reusable workflow:

Sensitive PDF -> Local PII Detection -> Human Review -> Redacted PDF -> AI

The most important lesson is straightforward:

Sanitize locally first. Use AI second. And here is a sample example of one of the pages of a 60-page document.


Thursday, May 21, 2026

How I Downloaded a 2-Hour YouTube School Convocation Video Using yt-dlp


I had a 2-hour school convocation video on YouTube that I wanted to save for my own future reference. I first tried using a GUI downloader, but it kept spinning and never actually downloaded the video. The working solution was to use yt-dlp, plus a JavaScript runtime and FFmpeg support.

This guide documents the exact process that worked on Windows.


1. Install yt-dlp

Download yt-dlp from the official GitHub release page:

https://github.com/yt-dlp/yt-dlp/releases

After downloading, place yt-dlp.exe in a folder such as:

D:\ch-software

Then open Command Prompt and go to that folder:

cd /d D:\ch-software

Test that it works:

yt-dlp --version

2. Install Deno for YouTube JavaScript Challenges

When I first ran yt-dlp, I saw a warning like this:

No supported JavaScript runtime could be found.
YouTube extraction without a JS runtime has been deprecated.

To fix this, I installed Deno using Windows Package Manager:

winget install DenoLand.Deno

Then I closed Command Prompt, reopened it, and checked:

deno --version

If winget is not recognized, install or update App Installer from the Microsoft Store.


3. Install FFmpeg

FFmpeg is important because YouTube livestream replays may download as HLS fragments. Without FFmpeg, the file may have timestamp issues or slight audio/video sync problems.

Install FFmpeg:

winget install Gyan.FFmpeg

Then close and reopen Command Prompt.

Check:

ffmpeg -version

4. Check Available Video Formats

Before downloading, I checked what quality options were actually available:

yt-dlp -F "https://www.youtube.com/watch?v=yZFp6eo91rM"

The output showed this:

91 mp4 256x144     15
92 mp4 426x240     30
93 mp4 640x360     30
94 mp4 854x480     30
95 mp4 1280x720    30

This confirmed that the best available version was 720p, not 1080p. If YouTube does not provide a 1080p stream, yt-dlp cannot create one.


5. Create a Custom Download Folder

I wanted to save the video into:

D:\my videos

So I created the folder:

mkdir "D:\my videos"

6. Best Working Download Command

The final command that worked was:

yt-dlp --fixup force --remux-video mp4 -o "D:\my videos\%(title)s_%(height)sp.%(ext)s" "https://www.youtube.com/watch?v=yZFp6eo91rM"

What this command does

Command partMeaning
yt-dlpRuns the downloader
no -f optionLets yt-dlp choose the best available format automatically
--fixup forceForces post-download fixes for timestamp/container issues
--remux-video mp4Repackages the video into a clean MP4 without re-encoding
-o "D:\my videos\%(title)s_%(height)sp.%(ext)s"Saves the file to the custom folder and includes the resolution in the filename
YouTube URLThe video to download

7. Important Note About -f best

I originally tried using:

-f "best"

But yt-dlp gave this warning:

"-f best" selects the best pre-merged format which is often not the best option.
To let yt-dlp download and merge the best available formats, simply do not pass any format selection.

So the better approach is to omit -f entirely and let yt-dlp pick the best available video/audio combination.


8. Understanding the Fragment Download

During the download, I saw:

[hlsnative] Total fragments: 1216

This is normal for a YouTube livestream replay. YouTube serves the video as many small HLS fragments. yt-dlp downloads all the fragments and assembles them into one file.


9. If Audio Is Slightly Out of Sync

After one earlier download, the file had a slight audio/video sync issue. The fix is to remux the MP4 using FFmpeg:

ffmpeg -i "input.mp4" -c copy "fixed_remux.mp4"

This does not reduce quality. It simply rebuilds the container.

If audio is still slightly off, shift the audio manually.

If audio is early

ffmpeg -i "input.mp4" -itsoffset 0.25 -i "input.mp4" -map 0:v -map 1:a -c copy "fixed_audio_delayed.mp4"

If audio is late

ffmpeg -i "input.mp4" -itsoffset -0.25 -i "input.mp4" -map 0:v -map 1:a -c copy "fixed_audio_advanced.mp4"

A small issue is usually around 0.1 to 0.4 seconds.


Final Command to Keep for Future Use

For the same type of YouTube school convocation video, this is the command I would keep:

mkdir "D:\my videos"
yt-dlp --fixup force --remux-video mp4 -o "D:\my videos\%(title)s_%(height)sp.%(ext)s" "YOUTUBE_URL_HERE"

Example:

mkdir "D:\my videos"
yt-dlp --fixup force --remux-video mp4 -o "D:\my videos\%(title)s_%(height)sp.%(ext)s" "https://www.youtube.com/watch?v=yZFp6eo91rM"

Bottom Line

The GUI downloader did not work, but yt-dlp worked once the proper supporting tools were installed. The key pieces were:

  1. yt-dlp for downloading.

  2. Deno for YouTube JavaScript challenge handling.

  3. FFmpeg for clean MP4 remuxing and timestamp fixes.

  4. No -f best; let yt-dlp choose the best available format automatically.

  5. Use --fixup force and --remux-video mp4 for cleaner final output.

Thursday, September 11, 2025

Access Boomi Insights via Postman: Ready-to-Use Collection

Following our previous guide on retrieving your Boomi Public API Key, this post shows how to set up a Postman collection and environment to query telemetry metrics from Boomi Insights.

Using Postman allows you to test APIs, explore available widgets, and integrate metrics into dashboards or automation scripts.


Step 1: Import the Collection and Environment

  1. Download the files:

  2. Open Postman, then import both files.

  3. Select the imported environment in the top-right corner.


Step 2: Configure Environment Variables

The environment uses three key variables:

VariableDescription
API_KEYYour Boomi Public API Key 🔑
STACKYour runtime stack name 🏗️
REGION_GATEWAYYour Boomi region gateway 🌐 (e.g., us-east-prod-gateway)

💡 Tip: Updating these once applies them to all requests in the collection.


Step 3: Example Requests in the Collection

NameMethodDescription
CPU MetricsGETFetches CPU utilization percentage for the stack
Memory MetricsGETReturns RAM usage percentage
Worker CountGETNumber of active workers in the stack
Worker Execution CountGETTotal executions by workers
List WidgetsGETRetrieve all available telemetry widgets

Each request uses environment variables to keep URLs and API keys generic and reusable.


Sample Request Structure

All requests follow the same pattern:

  • Endpoint URL: Uses REGION_GATEWAY and STACK variables

  • Header: x-api-key uses API_KEY variable

Note: The {{VARIABLE}} syntax pulls values from your Postman environment, making it easy to switch stacks or regions.


Step 4: Benefits of Using This Collection

  • Test multiple endpoints quickly without manual URL edits

  • Easily switch between runtime stacks or regions

  • Standardize metrics collection across your team

  • Serve as a foundation for dashboards or automated reporting


Using Boomi API Insights: A Step-by-Step Guide

Boomi provides API Insights, allowing you to monitor your integration runtime environments programmatically. From CPU and memory usage to worker counts and execution metrics, you can access telemetry data through the Insights API and integrate it into dashboards or monitoring tools.

This guide is split into two parts:

  1. Retrieving your Boomi Public API Key

  2. Accessing telemetry data using Postman


Part 1: Retrieving the Boomi Insights Public API Key

Before querying Boomi Insights APIs, you need an API Token and a Public API Key.

1. Generate an API Token

  1. Log in to your Boomi account.

  2. Go to Settings → User Profile.

  3. In the left pane, click Platform API Tokens.

  4. Generate a new token linked to your user account.

2. Access Boomi Insights

  1. Navigate to Boomi Insights (region-specific URL).

  2. Enter the following when prompted:

    • Account ID (where the token was created)

    • Username (associated with the token)

    • API Token

3. Get the Public API Key

  1. Go to Managed Cloud ServicesRuntime Dashboard.

  2. Select your runtime stack.

  3. Click Settings → Public API Settings.

  4. Click Get API Key to retrieve it.

⚠️ Note: You must have the Boomi Insights Admin role to access the Public API Key.


Part 2: Accessing Insights Data Using Postman

Once you have the Public API Key, you can query telemetry metrics. Use a generic Postman collection with environment variables for easy configuration.

Generic API Endpoints

MetricEndpointDescription
CPU Usage/telemetry?widget=cpu.utilisation.%25&stackname=YourStackShows CPU utilization
Memory Usage/telemetry?widget=ram.used.%25&stackname=YourStackTracks memory consumption
Worker Count/telemetry?widget=boomi.aw.count&stackname=YourStackReturns the number of active workers
Worker Execution Count/telemetry?widget=boomi.awExec.count&stackname=YourStackShows worker executions

Friday, July 25, 2025

🧘‍♂️ Monk Fasting: My 36-Hour Experiment with Hunger, Heritage, and Hot Water

Fasting has always fascinated me. Whether it's Karthika Masa Naktalu (evening-only meals), Ekadasi Ekabhuktam (twice a month), or my weekly Thursday fasting ritual, I’ve danced with hunger in different forms. And then came Monk Fasting—where you skip food for a full 36 hours. The idea was floated to me by one of the Educational Units (EUs) of WhatsApp University, and the benefits sounded like something out of a wellness brochure: detoxified digestion, sharpened focus, fat loss, and autophagy (that sci-fi-sounding cell-cleaning process). Despite years of fasting practice, sleeping with a completely empty stomach? That I could never dare.

☕The Hardest Part: Saying No to South Indian Coffee

Let’s talk priorities. I’m a coffee person—and not just your standard drip guy. My morning ritual involves mixing coffee powder with chicory root (3:1), brewing it in a moka pot, then blending that magic with freshly boiled whole milk and a generous splash of sugar. That, my friend, is South Indian coffee. After that comes mid-morning Indian tea, followed by an evening tea. And yes, the prep is a ceremony in itself. For this Monk Fast, I ditched the whole routine. No coffee. No tea. Just plain hot water, all day. Energy-wise, I was fine. But by evening, caffeine withdrawal kicked in and I got drowsy. At 10 PM—a whole two hours earlier than my usual schedule of watching the date change—I crashed. Slept like a baby until morning.

📆 The Timeline

  • Started fasting: Wednesday 10 PM 
  •  Broke fast: Friday 10 AM 
  • Total intake: Hot water. And a ridiculous amount of it.

📉 Results (and a Marital Audit)

I weighed myself before and after: five pounds down. My wife, naturally skeptical, supervised the weigh-in like a hawk. Verdict? Certified by the Ministry of Marital Surveillance.

🤔 What I Learned

  •  ✅ Weight loss: Probably temporary, but satisfying. 
  •  🛑 Digestive break: Felt like my stomach got a spa treatment. 
  •  😴 Drowsiness: Could’ve been the lack of caffeine more than the fasting.

🔄 Will I Do It Again?

Absolutely. It gave me more confidence around extended fasting and more respect for my usual caffeine reliance. If you're even half as crazy as I am, take it slow. Choose a day when you don't need to be an unpaid Uber driver or run marathons—and make sure your family’s nearby to make sure you are still alive.

Tuesday, March 25, 2025

Powershell hacks: How can I run powershell if I am not an admin

Dealing with admin restrictions on my laptop has become quite a hassle. My company won't allow me to have admin privileges, which means even running simple PowerShell commands requires me to ask for admin rights. This has added an extra layer of frustration to my workflow. Why do I need PowerShell, you might ask, when Python can solve many problems with scripts? Well, the catch is that even installing Python and importing libraries requires admin rights—leaving me stuck in a loop of limitations. After a bit of exploration, I found a way to work around this. Here's a simple trick:

powershell.exe -ExecutionPolicy bypass

Monday, April 27, 2020

Docker Diaries: Docker Pull Request for Ubuntu got Denied

Trying to install ubuntu image and executed the following command using Windows Power Shell. Apologies for not taking the screen capture. It looks something like this:


docker pull ubuntu
default is latest
Trying to pull ubuntu
pull access denied for ubuntu does not exist or may
require 'docker login': denied: requested access to the resource is denied


So I exited from the Power Shell and logged in again to Docker. Then used docker pull command voila!! it worked. This time I took the screen capture of the output though :)


Windows PowerShell
Copyright (C) Microsoft Corporation. All rights reserved.
PS C:\Windows\system32> docker login
Authenticating with existing credentials...
Login Succeeded
PS C:\Windows\system32> docker pull ubuntu
Using default tag: latest
latest: Pulling from library/ubuntu
d51af753c3d3: Pull complete
fc878cd0a91c: Pull complete
6154df8ff988: Pull complete
fee5db0ff82f: Pull complete
Digest: sha256:747d2dbbaaee995098c9792d99bd333c6783ce56150d1b11e333bbceed5c54d7
Status: Downloaded newer image for ubuntu:latest
docker.io/library/ubuntu:latest
PS C:\Windows\system32>

Tuesday, March 15, 2011

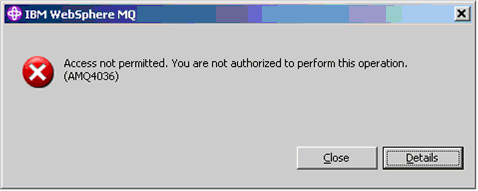
AMQ4036 Error connecting to queue manager on Linux using MQ Explorer or RFHUTILC

Issue: MQ Explorer fails to connect to a Queue manager located on Linux server. Fails with error AMQ4036 : Access not permitted. You are not authorized to perform this operation

Setup:

User has two IDs.
• Linux user ID: j1234d
• Windows ID: mydomain\jdove

Queue Manager (QM1) is on Linux machine and the Linux ID “j1234d” has access to the queue manager.
MQ Explorer is on Windows machine where the user is logged on with Windows ID “mydomain\jdove”.
When user tries to connect to QM1 from Windows machine using MQ Explorer, he/she gets the following error.

Resolution:

MQ Explorer makes a client connection and the credentials passed to the QM1 on Linux server would be “mydomain\jdove”. Since the ID “mydomain\jdove” is not defined on the Linux server, it fails to get authenticated.

Simple way to resolve:

1. Create ID “j1234d” on your Windows machine and use MQ Explorer to connect to the QM1 on Linux Server

However above fix would need you to log off current Windows session and sign in as “j1234d”. This is a pain.
Instead, do the following:

Create ID “j1234d” on your Windows machine and use MQ Explorer to connect to the QM1 on Linux Server
Create a Windows batch script as shown :

set APPDATA=

runas /env /user: "strmqcfg -d"

So for the above example it would be:

set APPDATA=D:\mqeclipse\mqcm5dev

runas /env /user:j1234d "strmqcfg -d"

When you run the above script, at the prompt enter the password you have set for the id you created for id ‘j1234d’
The runas  command makes the MQ Explorer to run under the local id which is the equivalent of the Linux id. When we run the MQ Explorer process under the id , the credentials will be passed as is ( eg:’j1234d’) and you will be able to connect to the queue manager since this ID on Linux server has access to the queue manager QM1.

The same solution can be used  if you are getting error "Not authorized" with RFHUTILC utility. The following screen shows the error.
Use the above approach to circumvent the error.
Hope this helps!!!


Sunday, June 20, 2010

wsgw (mywsproxy): Valid backside connection could not be established: Failed to establish a backside connection


Setup:

  1. Datapower XI50 is on corporate network
  2. Microsoft Virtual PC 2007 with Windows XP and hosting WebSphere application server 6.1 ( mywasnode)
  3. Web Service Proxy is virtualizing the Web services hosted on mywasnode.
    Following is the Web Services proxy set up.


Request comes to HTTP front side handler AddressSearchFSH via URI <dp:ipaddress>/EastAddressSearch and is directed to actual service end point

<remote-endpoint-host>:9080/EastAddress/Services/AddressSearch. This is a plain and simple setup. However, I have been encountering the following errors


After much head scratching, I found the solution and as it happens with all such issues, the resolution is very simple. The culprit was Windows XP firewall. Since I had WAS running locally, Windows XP firewall was obstructing all the requests coming from Datapower to my WAS Web Service. Added the Web services port (9080 in this case) to the firewall exception list, voila!! everything started working fine.

For those of you wondering where to add this, please see the following screen shots.


Go to Start> Settings. Control panel > Security center> click on Manage settings for Firewall, On the Windows firewall window , go to exceptions tab, click on Add Port button.

In the pop-up window enter the port number and give a description to your exception and click OK. You are done.


Hope this is helpful.

Thursday, August 27, 2009

WebLogic Server does not start

Issue: When you start WebLogic Server instance, the server would not come up and the start script hangs.
Symptoms:
In the /servers/AdminServer/logs/Adminserver.log you would find the following error.
####<Aug 27, 2009 3:47:58 PM EDT> <Critical> <WebLogicServer> <gaalpltapp0040> <AdminServer> <main> <<WLS Kernel>> <> <> <1251402478485> <BEA-000386> <Server subsystem failed. Reason: java.lang.NumberFormatException: null
java.lang.NumberFormatException: null
at java.lang.Integer.parseInt(Integer.java:415)
at java.lang.Integer.parseInt(Integer.java:497)
at weblogic.ldap.EmbeddedLDAP.validateVDEDirectories(EmbeddedLDAP.java:1035)
at weblogic.ldap.EmbeddedLDAP.start(EmbeddedLDAP.java:212)
at weblogic.t3.srvr.SubsystemRequest.run(SubsystemRequest.java:64)
at weblogic.work.ExecuteThread.execute(ExecuteThread.java:200)
at weblogic.work.ExecuteThread.run(ExecuteThread.java:172)
>
####<Aug 27, 2009 3:47:58 PM EDT> <Notice> <WebLogicServer> <gaalpltapp0040> <AdminServer> <main> <<WLS Kernel>> <> <> <1251402478508> <BEA-000365> <Server state changed to FAILED>
####<Aug 27, 2009 3:47:58 PM EDT> <Error> <WebLogicServer> <gaalpltapp0040> <AdminServer> <main> <<WLS Kernel>> <> <> <1251402478509> <BEA-000383> <A critical service failed. The server will shut itself down>
####<Aug 27, 2009 3:47:58 PM EDT> <Notice> <WebLogicServer> <gaalpltapp0040> <AdminServer> <main> <<WLS Kernel>> <> <> <1251402478511> <BEA-000365> <Server state changed to FORCE_SHUTTING_DOWN>


Solution:

When you see above error, please check
1. if the disk space is full
2. if disk space is fine, then delete the following file
/servers/AdminServer/data/ldap/conf/replicas.prop
and restart the server. WLS sometimes corrupts the file replicas.prop and is often results in above error


Tuesday, July 07, 2009

My New Love : Foxit PDF Reader

Long time no blogging. With lot happening in the job market, finance market, domestic front, I could not blog much. Hope you have been missing me :)
Anyways I just wanted to share my love for new pdf reader I have been using. I thought ADOBE was the only PDF reader available with the fancy features. Following have been my wish list items for ADOBE reader:
1.It should allow me to highlight the text, underline the text as I read my IBM red books
2. It should allow saving of any PDF forms with the filled in data so that I could re-use the data

Correct me if I am wrong, I could not do the above with ADOBE PDF reader. Then I came across Foxit reader which would perform the above and many more. If you know it already please spread the word. If not please try Foxit reader for Windows.
Hope you enjoy it.

Friday, January 09, 2009

WebSphere, Middleware, MVS Magazines for FREE!!!

Xephon who used to publish MQ Update, MVS update etc ..( all IBM Middleware related magazines) apparently went out of business. But good folks there helped the IBM community by putting the magaizines for download at
www.cbttape.org/xephon for FREE.

You may down load all these for FREE which includes some of the work I have published :)

Wednesday, April 16, 2008

WebSphere MQ

Here is link to quick reference guide for MQ RunMQSC commands RUNMQSC QuickReference

Thanks to Michael Dag of MQ Systems

Monday, October 22, 2007

Java: Patterns

Found the following excellent book on Patterns:
http://www.patterndepot.com/put/8/JavaPatterns.htm

Wednesday, March 21, 2007

Chat: Long time No blog!!!

Howdy visitor!!! I could recover my password. Thanks to my cousin who woke me up to return to the blog my chat. Will keep you posted with my next blog. Let me see.. WHat do I write about? I do not'know?!!!

Tuesday, May 02, 2006

Tech: Web Service interoperability part:2

Well, I thought the creation of Web service was simple. But creating a Web service to authenticate an user is not that simple. It involves encryption. So why to invent the wheel again. So I GOOGLED and voila I found a C# Web service on the internet that exactly what I had in mind.

So down load the code,install it and pose as if you developed. Simple!! Right? So I thought. First of all it is in C#. I am not familiar with C# ( is it C hash or sharp by the way?). So had to get a book from the library and got familiarized with C#. Convinced everybody that I would need .NET development environment. Failed to get IIS installed on my machine due to the BIG security concerns my company has. So used VS.net to connect to another server where IIS was there and deployed the Web service. Had to tweak the code to work with our AD set up. Got the Web service working.

Well!!! The application which is supposed to authenticate the user was written JSP/JAVA. So the plan is to make this JSP client to call ASP.net client which in turn would validate the users. Hmmmm... Clumsy . Don't you think?

Again.. I need to meet the dead line. What the heck as long as it is working. So went ahead and implemented the above method. Still at the back of my head I am still thinking there should be JSP interface for this. Let me see what I can come up with.

Tuesday, January 10, 2006

Tech: Webservice interoperablity

Ain't it cool.. If one has a webservice that validates the users against active directory? Even better,if I have a java client and .net webservice to validate the users. I have googled like a fanatic and could not find a clean way to do this. My idea is simple.

.NET is a buddy to active directory. So to make it communicate with Active directory for user validation should be a piece of cake. Right?? Now add Java client/PHP client/xyz client.. voila you have got yourself an enterprise solution.

Enough of sweet talk. I have a 50% solution. WIll post once I have a working Java front end ready.

Keep your fingers crossed.....

Thursday, August 18, 2005

Rant: How come some companies hate Internet-1

Sorry!!! I am no longer having access to my blog from my office. The big brother is bit paranoid and cut access to all Web sites. Well !!! that is the reason for this rant. How come some copanies hate Internet?
My company pays me to do work. They have every right to deny the Internet. While they say how "not browsing the internet" improves the company productivity, I have my own reasons to say how it helps me.
1.Internet helps me to do my work easily. For example, I copy my code from google groups half the time. Am I not saving bunch of money for my employer, since he/she need not pay for the training?
2. Can you be really secure by not connecting to the outside world? If that is the case we should all live in the islands all by ourseleves. Even the concept of family/ society have to be redefined. Ain't it?
3. Do we really save time by not allowing the internet? Well I spend time in chatting with the team mates.. my coffee breaks have become longer..

Hey all the above reasons are null and void. Since at the end of the month my company pays for my bills. So..

Tuesday, July 26, 2005

Tech: dotnetnuke

Last month I was invited by one of my friends to attend a .NET user group where a user presented very good things about the dotnetnuke. It seems to be quite appealing. I ate the pizza and enjoyed the presentation.
Came back to home and decided to try the "dnn" thingy.
Down loaded it and tried configuring. First time it took five hours to configure. Because the documentation is not that helpful and user forums had more questions than the answers. SO what the heck. Tried it anyway.

Now I want to do this:
1. Have a portal with xyz.com
2. Have another portal with abc.com
3. Both would use one dnn configuration. I do not want to consume the the hosting space by installing another configuration
4. Use the same SQL server database. My hosting provides me only one database.

Any ideas how this can be achieved??????????

Saturday, June 11, 2005

$$$: Fidelity Four-in-one index fund

I am at dilemma. It seems I am going to owe awful lot of money to uncle Sam. Ok... It's awful lot from my standards. May be peanuts for you...
I was suggested...
1. Have dependents ( Hey!!! I am working diligently)
2. Buy a house ( Do you listen to the NPR news.. The bubble is going to burst... I am waiting for it)
3. Increase my 401K retirement contribution

S0, I was suggested by Fidelity advisor to look for Fidelity Four-in-One ticker symbol : FFNOX

Will it be another fiasco for me or will it be a fortune?